Home

Wednesday, June 27, 2012

cabinet door picture frame

I purchased a ton of display cabinet doors at a rummage sale for 25 cents a piece. I took one and spray painted it black. I then took some gorilla glue and place the wood plaque(bought from hobby lobby) on top of the door. I had a small piece of sheet metal, and I covered it with some cream colored material that I had stamped a French Script image on. I then glued that to the wood plaque. I bought from the dollar store some magnetic clips and glued a black ribbon on top of that clip. This can be used as a picture frame or you can add anything magnetic to it. Thanks for looking.

Magnetic Board Display

This is a piece of 12X24 sheet metal which was bought at Lowes for just under 4.00. I took a foam board and I taped with double sided tape to the back of the sheet metal so it would not bend.  I took a pillow case and cut it down to size and hot glued it to the sheet metal/foam board. I took a ribbon and I stapled it to the back of the board. I placed a bow on the front with double sided tape and then I placed magnetic clothespins to the front. You can use this for pictures or notes! Thanks for looking.

Spray Painted Bottles

Here are some wine bottles that I spray painted black. I purchased this tray at Hobby Lobby for 2.00 and the flowers were bought at Hobby lobby too.

Here are some bottles spray painted in blue. The butterflies were given to me as a gift and the other flowers were bought at Hobby Lobby.

Love Blooms Here

Here is my crate that I bought for .50 cents at a rummage sale. A little dirty. I cleaned it up and sprayed painted it a yellow color.

Here is the finished results. I placed some jute on the handles. I had some mason jars that I purchased from a rummage sale for .50 cents each. I purchased some flowers from Hobby lobby and placed them in the mason jar. The plaque I bought for .50 cents from a rummage sale. To get the words
Love Blooms Here. I printed it out on regular paper but I mirrored the image. I then took a pencil and rubbed it over the lettering. I then placed the image(with the pencil rubbing image side) down on the plaque and then took a pencil and traced over the letters. The rubbing traced the letters onto the wood plaque. I then took a black marker and traced over the letters to get a darker image. Hope that makes sense. I hope to find a different selection of flowers to add to the other mason jars. Thanks for looking

Monday, March 19, 2012

Liebster Award

 { A German word meaning "Dearest or Beloved"}


What an exciting day for me. I just found out I was nominated for a Liebster Award for my Blog site and it is my Birthday too!!
A Big Thank you to http://seekingecochic.blogspot.com (Tricia Marie)
for nominating me for this award and also to Mel @ craftymeldesigns.com  for letting me know I won too!!!

These are both very crafty ladies! Thank you again!!

Now onto the official rules

1. Choose FIVE UP AND COMING blogs to pass the award onto.

2. Show a BIG THANKS to the blogger who gave the award to you by linking back to them.


3. Post the AWARD on your blog. List the bloggers you are giving the award to with links to their site.

Here we go
These are the sites that I have chosen that have some real unique crafts or recipes. Go check them out!

1) http://www.missinformationblog.com- She has some wonderful recipes and she also has her first giveaway of crockpot lotion bars!
2) http://homehappyhome.blogspot.com  Amy has some wonderful post on her home and all the updates she has done. She has done a great job!
3) http://livingoncypresshill.blogspot.com This is a new site and she has a really cute mail holder to check out!

4) http://mommyinthemountains.com  I found her through a link party and she has this amazing mirror transformation. She also has some great recipes too!

5) http://www.onemoretimeevents.com what intrigued me was her coffee table makeover. Such great style!

Congratulations dont forget to pass it on!


Monday, March 12, 2012

Burlap Covered Cork Board

Here is a corkboard that is covered in Burlap material. I hot glued it to the back of the corkboard, then I used decorative furniture tacks around the board. I found a removable wall sticker at the dollar store that says, "There is no place like HOME". I added a couple small clothespins that I spray painted brown, where I am placing photos of my family.

Tuesday, February 14, 2012

terra cotta coasters

Take any size terra cotta plant holder(found at Hobby lobby). I used a small size for coffee mugs. Spray paint the coaster with primer first. I used a white primer. Then I spray painted it in Rustoleum Heirloom White. Once dried. I added my paper.

I used a glass as my template for cutting the paper.

I modge podged the paper onto the coaster. I then placed more modge podge on top. Once dried I took a sponge with some brown disressing ink. I wiped it along the coaster inside and out to give it a distressed look.


Once the ink was on. I sprayed the coasters with a sealer. Whalla! All done. Easy Peasy!

Thursday, December 8, 2011

Yarn Ball Wreath

Yarn Ball Wreath

I started with a wreath that I covered in burlap
I used multiple colors of yarn and different size foam balls. I used jute, cream color, gray, and then I took some of my smaller ornaments in a marroon sparkle color and filled in some of the holes.


My inspiration came from Pintrest. Here is the link to the blog

Linking up to:

Saturday, December 3, 2011

Christmas Wreath

Christmas Wreath
Here is a christmas wreath I made with red sparkly ribbon, which I wrapped around the wreath. I then added an ornament from Hobby Lobby in the middle and added some ribbon flowers to the front. Real Simple!
I am linking up to:
http://kim-toomuchtimeonmyhands.blogspot.com/search/label/get%20schooled%20saturday
and
http://craftomaniac.blogspot.com/2011/12/craft-o-maniac-monday-link-party.html

Wednesday, November 23, 2011

multiple projects

Here is a tray I made from a plaque that I bought at Hobby Lobby. I added some handles and some candle holders to the bottom to make into a tray. I added some lanterns I bought on sale at Lowes. this is a centerpiece on my dining room table

 I saw this done on multiple sites. It was so easy to do. I just inserted the balls into the lights and voila! See next picture for the lights on.


I saw this featured on pintrest. Here is the inspiration I received it from http://www.countryliving.com/crafts/projects/diy-home-decor-crafts#fbIndex1
My neighbor has a ton of these cable spools and I grabbed one to try it out. I bought some long dowls and cut them down. I did not have to glue any of them down because they fit so snug. I spaced them apart accordingly to how I wanted it spaced out. I am more of an "eye it"  type of person than measuring. I had spray painted this Rustoleum Heirloom White and gave it a shabby look by sanding the sides. I wanted the added height for the shelf for my little boy. I had a hard time finding something besides (expensive) casters. I finally found a wooden step stool at Goodwill. I took the top off of it. I placed a lazy susan piece(found at lowes/menards) on top of the stool and then placed the cable spool on top to make it turn. I could not get the paint to turn out great on the top of the spool so I covered it with some filler and material.
Thanks for stopping by!

Wednesday, October 19, 2011

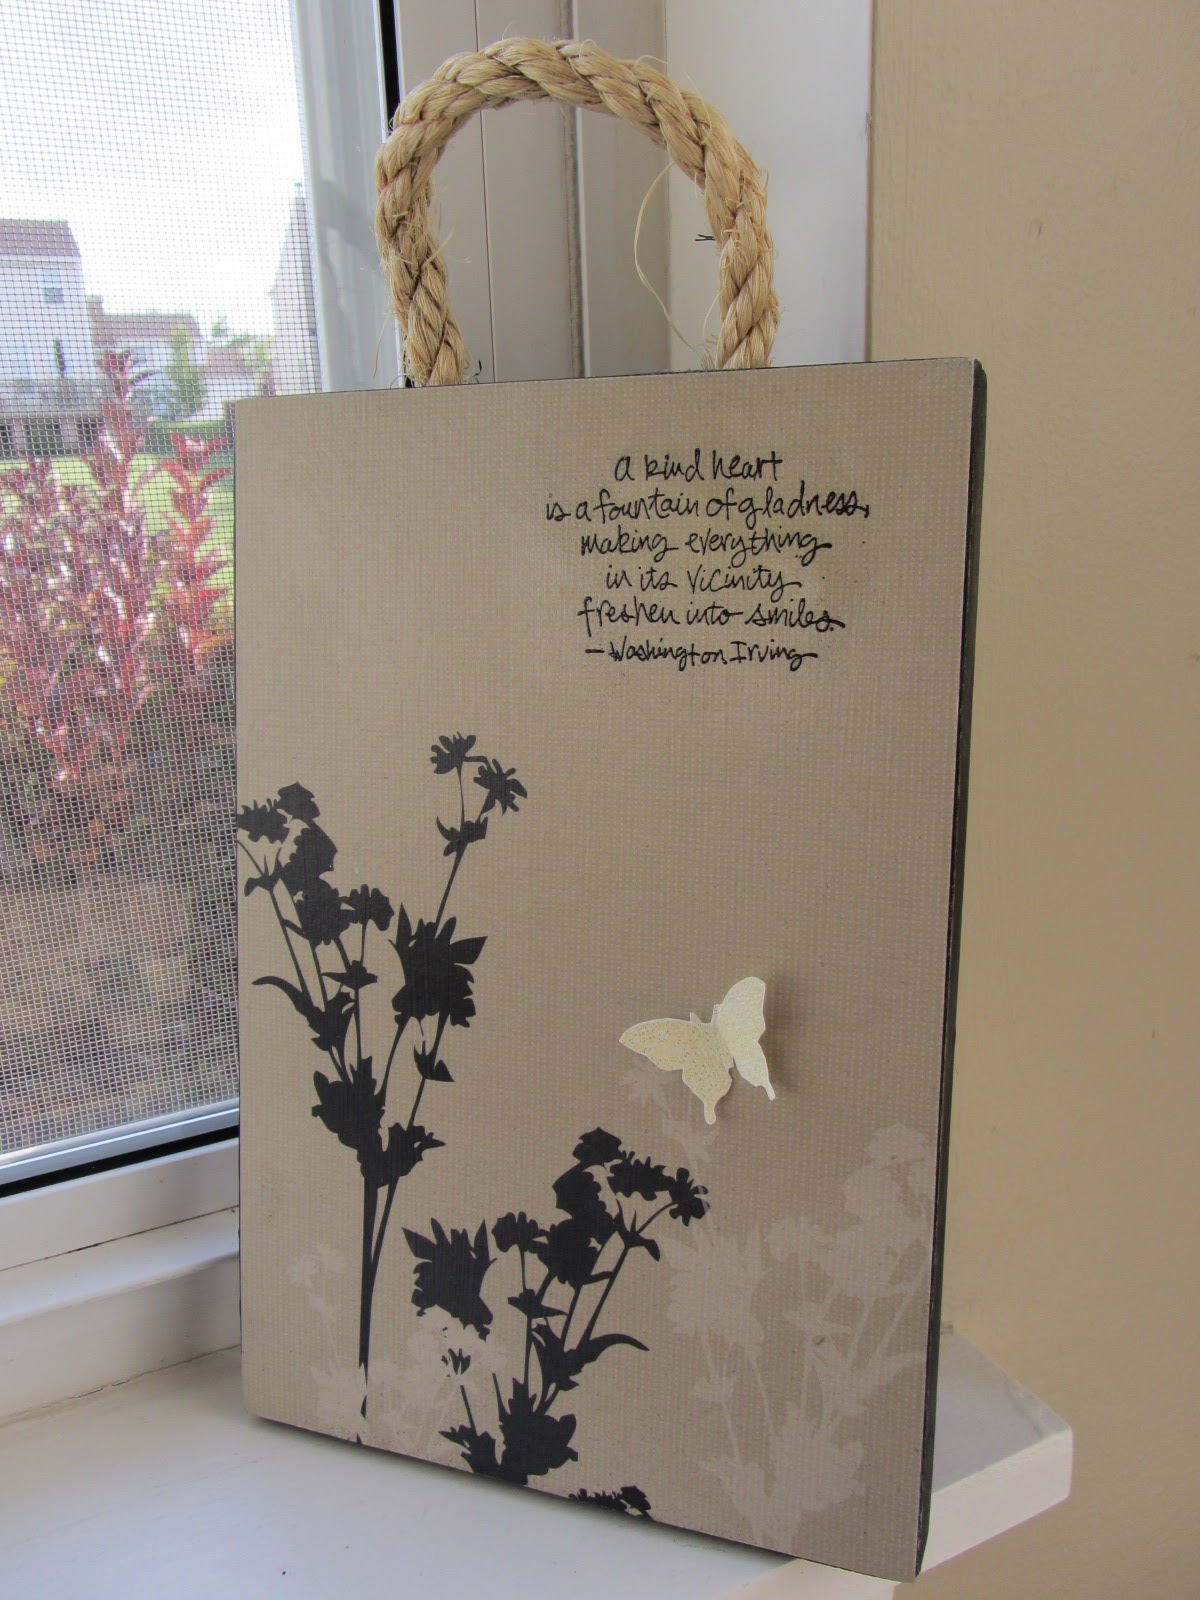
 Here is a board that I picked up at a rummage sale, super cheap. I spray painted it black.


Here is the end result of the board. you can hang it on a wall or even a door handle. I used some scrap paper and modge podged it on the board, then I embossed a butterfly and glued it to the board.


I used a stampin up saying on the board as well.

I am linking up to the craft ladies at http://lollyjaneboutique.blogspot.com/.  Also linking up to http://craftomaniac.blogspot.com/.

Thursday, August 4, 2011

Live Like You Mean It

I found some frosted glass coasters at Hobby Lobby for a $1.00 and thought I could make something with these! I embossed a pink flower with a little diamond in the middle of the blower and also embossed a silver butterfly. The saying at the bottom is "live like you mean it". Thanks for looking.

Baby Picture Holder


Above is a picture frame. You can insert a picture of your precious little girl. The saying in the bottom is hard to read but it says "sing me a lullaby"


Sunday, July 3, 2011

Box Tray

Here is a wood box that I picked up from a Rummage sale for .50 cents. I was trying to figure out what to do with it. I have a finished project, once I get the picture taken I will post it. Cant wait for you to see the results. Thanks!

 Here is the finished product. I made it into a tray. I added some round feet to the bottom. Added some oil rubbed bronze handles and some decorative paper on the inside. Used Heirloom White spraypaint and sanded the feet and the tray to give it a shabby look. I stamped the tope of the tray with brown staz on ink and a french script type stamp.  The picture does not show the words going around the whole tray but it does go all the way around the top. Thanks for looking!

Wednesday, May 4, 2011

Completed Projects

I finally completed a few projects. It has been really fun creating these! Thanks for all the inspiration! Check out the Gallery Page for my projects. Thanks for looking!

Friday, April 15, 2011

Hi!

Thanks for checking out my blog. I am really new to this blogging thing, so bear with me as I get this site up. Any suggestions would be welcomed! Thanks!